Installing SCC-AC in Your Salesforce Organization
-
Installing managed package:
-
Search for Partner Telephony Setup in Quick Find. Choose No. 6 (Set Up More Amazon Connect Features), Choose Install button in Install Managed Package section, and then Install for all users.
Note: Install for all users is required to make sure all user profiles have access to SCCAC Apex classes.
Note: To upgrade the SCC-AC package to a newer version in the future, see Updating SCC-AC.
-
-
To clone permission sets:
- In Salesforce Setup, search for Permission Sets in Quick Find.
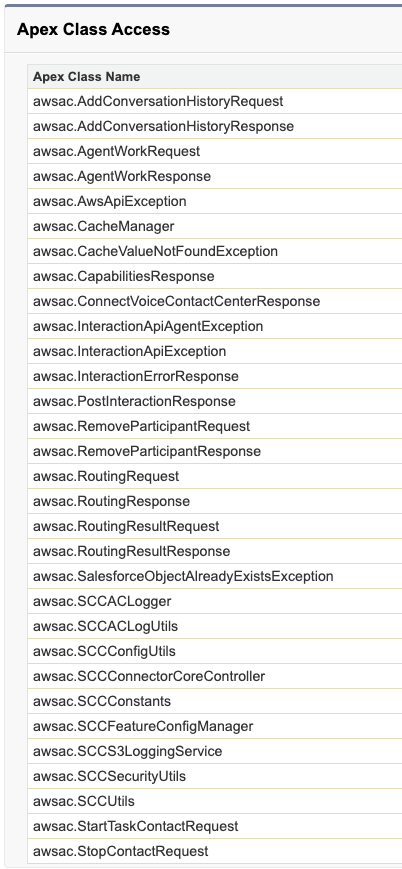
- Clone SCC Administrator Placeholder and rename Label to SCC Administrator and API Name to SCC_Administrator. Choose Save. Configure SCC_Administrator access to all SCCAC Apex classes by following Salesforce guidance if Install for all users was not selected in the Installing managed package step above.
- Clone SCC Agent Placeholder, and rename Label to SCC Agent and API Name to SCC_Agent. Choose Save. Configure SCC_Agent access to the following Apex classes by following Salesforce guidance if Install for all users was not selected in the Installing managed package step above.
- Note: If you are using profile which is less privileged than Salesforce provided “Standard User” profile, follow this step to insure user has required permissions. For each of the newly cloned permission sets, go to System Permissions. Enable the API Enabled, Create Public Links, Customize Application, Lightning Experience User, Manage Custom Permissions, View Roles and Role Hierarchy, and View Setup and Configuration permissions.
-
To assign an SCC-AC related permission set to a user:
- Go to Users, choose a user’s name, hover over Permission Set Assignments and choose Edit Assignments. Select required permission set in the Available Permission Sets column, and choose the right arrow Add to move it to the Enabled Permission Sets column. Choose Save.
- For SCCAC Administrator the permission set is SCC Administrator.
- For SCCAC Agent the permission set is SCC Agent.
- Go to Users, choose a user’s name, hover over Permission Set Assignments and choose Edit Assignments. Select required permission set in the Available Permission Sets column, and choose the right arrow Add to move it to the Enabled Permission Sets column. Choose Save.
-
To create the connected app:
**Note: If you're not able to enable creation of Connected Apps in Salesforce, contact Salesforce Customer Support to have this re-enabled. This can be done by creating a Salesforce Support case.
-
Log in as SCCAC Administrator user
-
Run the following code in an Anonymous window (Developer Console → Debug → Open Execute anonymous window). Be sure to fill in the placeholder at the end (email@email.com) with your email address.
String generateUniqueConsumerKey(Integer length) {
    String charset =
        'ABCDEFGHIJKLMNOPQRSTUVWXYZ' +
            'abcdefghijklmnopqrstuvwxyz0123456789';
    String timestamp = String.valueOf(System.currentTimeMillis());

    // Calculate the length needed for the random part of the key
    Integer remainingLength = length - timestamp.length();

    // Ensure remaining length is positive; otherwise, adjust
    if (remainingLength <= 0) {
        return timestamp.substring(0, length);
    }

    // Generate the random part of the key inline
    String randomPart = '';
    for (Integer i = 0; i < remainingLength; i++) {
        // Generate a random index and cast the result to Integer
        Integer randomIndex =
            (Integer)Math.floor(Math.random() * charset.length());
        // Append the character at the random index to the result string
        randomPart += charset.substring(randomIndex, randomIndex + 1);
    }

    // Combine timestamp and random part
    return timestamp + randomPart;
}

String createCertificate() {
    awsac.SCCMetaDataService.MetadataPort service =
        new awsac.SCCMetaDataService.MetadataPort();
    service.SessionHeader =
        new awsac.SCCMetaDataService.SessionHeader_element();
    service.SessionHeader.sessionId = UserInfo.getSessionId();
    awsac.SCCMetaDataService.SaveResult createMetaDataResult =
        new awsac.SCCMetaDataService.SaveResult();
    awsac.SCCMetaDataService.Certificate certificate =
        new awsac.SCCMetaDataService.Certificate();
    certificate.fullName =
        awsac.SCCConstants.PLACE_HOLDER_CERTIFICATE_LABEL;
    certificate.caSigned = false;
    certificate.encryptedWithPlatformEncryption = false;
    certificate.keySize = 2048;
    certificate.masterLabel =
        awsac.SCCConstants.PLACE_HOLDER_CERTIFICATE_LABEL;
    certificate.privateKeyExportable = true;
    createMetaDataResult = service.createMetadata(
        new List<awsac.SCCMetaDataService.Metadata>{certificate})
            .get(0);
    if (!createMetaDataResult.success) {
        String errorMessage = '';
        for (awsac.SCCMetaDataService.Error error :
            createMetaDataResult.errors) {
            errorMessage = errorMessage + error.message;
        }
        throw new awsac.MetaDataApiException(errorMessage);
    }
    awsac.SCCMetaDataService.IReadResult readMetaDataResult = null;
    readMetaDataResult = service.readMetadata('Certificate',
        new String[] {
            awsac.SCCConstants.PLACE_HOLDER_CERTIFICATE_LABEL
        });
    awsac.SCCMetaDataService.Certificate cert =
        (awsac.SCCMetaDataService.Certificate) readMetaDataResult
            .getRecords()[0];
    Blob certificateBlob = EncodingUtil.base64Decode(cert.content);
    return certificateBlob.toString();
}

void createConnectedApp(String adminEmail) {
    awsac.SCCMetaDataService.MetadataPort service =
        new awsac.SCCMetaDataService.MetadataPort();
    service.SessionHeader =
        new awsac.SCCMetaDataService.SessionHeader_element();
    service.SessionHeader.sessionId = UserInfo.getSessionId();
    awsac.SCCMetaDataService.SaveResult createMetaDataResult =
        new awsac.SCCMetaDataService.SaveResult();
    awsac.SCCMetaDataService.ConnectedApp app =
        new awsac.SCCMetaDataService.ConnectedApp();
    app.fullName = awsac.SCCConstants.GLOBAL_CONNECTED_APP_FULL_NAME;
    app.label = awsac.SCCConstants.GLOBAL_CONNECTED_APP_LABEL;
    app.description = 'ConnectedApp to access Interaction Service APIs';
    app.contactEmail = adminEmail;

    awsac.SCCMetaDataService.ConnectedAppOauthConfig connectedAppConfig=
        new awsac.SCCMetaDataService.ConnectedAppOauthConfig();
    connectedAppConfig.callbackUrl = 'https://salesforce.com';
    connectedAppConfig.scopes =
        new String[]{ 'Api', 'Basic', 'RefreshToken', 'Interaction'};
    app.oauthConfig = connectedAppConfig;
    app.oauthConfig.certificate = createCertificate();
    app.oauthConfig.consumerKey = generateUniqueConsumerKey(64);
    app.oauthConfig.isAdminApproved = true;
    app.oauthConfig.isClientCredentialEnabled = true;
    app.oauthConfig.isCodeCredentialEnabled = false;
    app.oauthConfig.isCodeCredentialPostOnly = false;
    app.oauthConfig.isConsumerSecretOptional = false;
    app.oauthConfig.isIntrospectAllTokens = false;
    app.oauthConfig.isNamedUserJwtEnabled = false;
    app.oauthConfig.isPkceRequired = true;
    app.oauthConfig.isRefreshTokenRotationEnabled = false;
    app.oauthConfig.isSecretRequiredForRefreshToken = true;
    app.oauthConfig.isSecretRequiredForTokenExchange = false;
    app.oauthConfig.isTokenExchangeEnabled = false;

    awsac.SCCMetaDataService.ConnectedAppOauthPolicy connectedAppPolicy=
        new awsac.SCCMetaDataService.ConnectedAppOauthPolicy();
    connectedAppPolicy.ipRelaxation = 'ENFORCE';
    connectedAppPolicy.isTokenExchangeFlowEnabled = false;
    connectedAppPolicy.refreshTokenPolicy = 'infinite';
    app.oauthPolicy = connectedAppPolicy;

    app.profileName = new String[]{'System Administrator'};
    app.permissionSetName =
        new String[]{'SCC Administrator', 'SCC Agent'};
    createMetaDataResult = service.createMetadata(
        new List<awsac.SCCMetaDataService.Metadata>{app}).get(0);
    if (!createMetaDataResult.success) {
        String errorMessage = '';
        for (awsac.SCCMetaDataService.Error error :
            createMetaDataResult.errors) {
            errorMessage = errorMessage + error.message;
        }
        if (errorMessage.contains('permission set')) {
            errorMessage = errorMessage +
            ' Please verify creation of permission set : \"' +
            awsac.SCCConstants.SCC_ADMINISTRATOR_PERMISSION_SET_LABEL +
                '\" & \"' +
                    awsac.SCCConstants.SCC_AGENT_PERMISSION_SET_LABEL +
                        '\".';
        }
        throw new awsac.MetaDataApiException(errorMessage);
    }
}

createConnectedApp('email@email.com'); -
Afterwards, confirm that you see SCC_PLACE_HOLDER_CERTIFICATE in Certificate and Key Management, and the connected app awsscc GLOBAL_CONNECTED_APP in App Manager.
-
In App Manager, find the connected app awsscc GLOBAL_CONNECTED_APP and choose the arrow in the rightmost column, then select View. On this screen, choose Manage Consumer Details. This will send a verification code to your email address. Use the code, and then copy the consumer key and consumer secret to Notepad for later use.
-
Go to Setup > App Manager > awsscc GLOBAL_CONNECTED_APP > Manage and choose Edit Policies
- For Permitted Users, select Admin approved users are pre-authorized.
- For Client Credentials Flow > Run As, select your system admin user. Choose Save.
Note: If your organization prefers to use a dedicated Client Credentials Flow "Run As" user with minimum permissions instead, see Appendix E — Minimum Permissions for SCCAC Salesforce Users.
- In the Profiles section, choose Manage Profiles and check the box for System Administrator, then choose Save.
- In the Permission Sets section, choose Manage Permission Sets. Check the boxes next to SCC Administrator and SCC Agent, and then choose Save.
-
Allocate capacity for sccac cache partition:
- Go to Setup > Custom Code > Platform Cache > Select sccac under Name
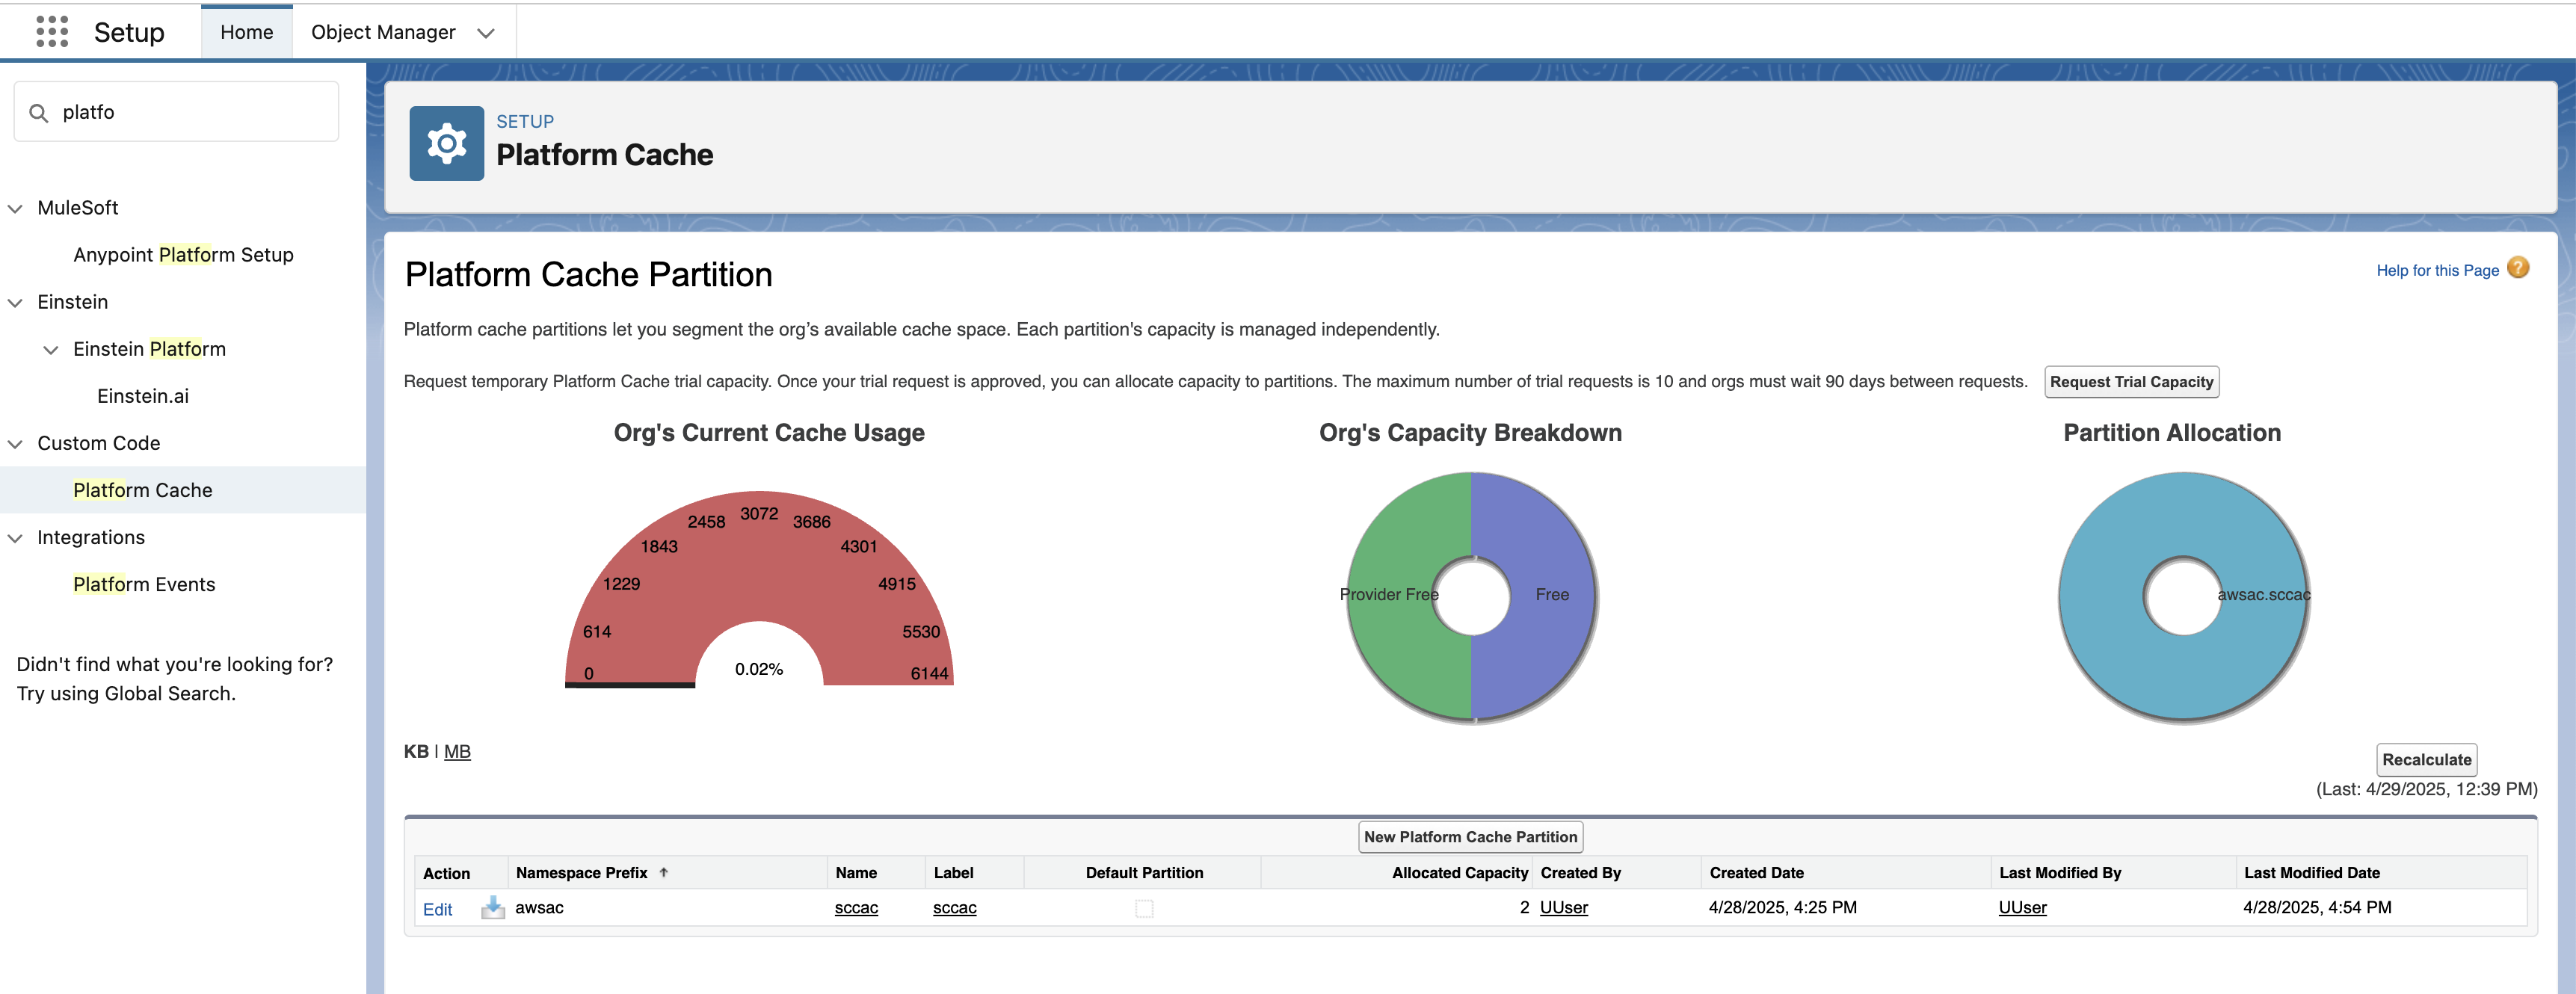
- Select Edit
- Under Org Cache Allocation, allocate 1 for Provider Free or Organization.
- Select Save.
-
Create a Lightning App for SCC-AC. To create a new Lightning App with Console navigation style:
- Go to Apps, App Manager, and then choose New Lightning App.
- Enter whatever name you like, choose Next.
- Under Navigation Style, select Console navigation, and choose Next.
- Choose Add Utility Item and then Omni-Channel.
- Choose Add Utility Item, Amazon Connect for Salesforce, and check the Start automatically check box. Choose Next.
- If you will be handling chats, search for Messaging Sessions, then choose the right arrow to move it to the Selected Items column. If you handle voice contacts, search for Voice Calls and add them as well. Choose Next and Next again.
- Select System Administrator and Standard User or any profile you are using for agents/users and choose the right arrow button to add them to Selected Profiles.
- Choose Save and then Finish.
-
Go to the SCC Agent and SCC Administrator permission sets you cloned and choose Assigned Apps. Hit Edit, and then find the Lightning app you created. Choose the right arrow to add it to the list of Enabled Apps.