Log in as a System Administrator user. Go to Permission Sets, SCRT2 Integration User, Object Settings, and then SCC Events.
Enable both Read and Create and choose Save.
To grant agent access to the other Salesforce user for use in testing:
Go to Users, Users and then select the SCCAC Agent.
Select Permission Set Assignments, Edit Assignments, and then add Contact Center Agent (Partner Telephony) and Contact Center Bring Your Own Channel User if it’s not already added. It should appear under Enabled Permission Sets along with SCC Agent. Choose Save.
Go to Feature Settings, Service, Voice, Partner Telephony Contact Centers and select the name of the contact center you created. Scroll down to the Contact Center Users section, choose Add, then choose the plus sign next to SCCAC Agent and choose Done. You will receive an email when the user is added to the contact center.
(Optional, required for agent-to-agent transfer for chat) Grant the permission set license assignment and permission set to the user you want to use to initiate agent-to-agent transfers
Go to Users > Users and select the SCCAC Agent user, or whichever user you want to use for initiating agent-to-agent transfer.
Choose Permission Set License Assignments, choose Edit Assignments, check the box for Partner Messaging User and then choose Save.
Choose Permission Set Assignments, choose Edit Assignments, choose Contact Center Bring Your Own Channel User in the left sidebar and choose the right arrow to move it to the right side, and then choose Save.
Go to Users > Permission Sets and select SCC Agent. Choose System Permissions and Edit and grant the Customize Application permission.
Go to Feature Settings, Service, Messaging, Messaging Settings, and then choose New Channel.
Choose Start, scroll down and select the SCC messaging channel definition, and then choose Next.
If you don’t see any options on this page, wait a few moments and then choose Back followed by Next again.
Choose Use an existing contact center, select the contact center you created earlier in the dropdown, and then choose Next.
Enter whatever name you like in the Channel name field, Select the API name field, and then choose Save.
If the Connected App Name field of the Conversation Channel Definition section is blank, choose Modify Conversation Channel Definition. In the Connected App Name dropdown, select the name of the connected app (should be awsscc GLOBAL_CONNECTED_APP) and choose Save.
Choose Activate on the upper-right of this page, to activate the channel, choose Active.
Note down the Channel Address Identifier. You will need it for later steps.
Go to Feature Settings, Service, Omni-Channel, and then Presence Statuses.
Choose New.
Enter Active (or any name you like) in the Status Name field.
Make sure Online is selected in Status Options.
Under Service Channels, choose Messaging, Phone and then choose the right arrow so it appears under Selected Channels and choose Save.
Go to Users and then Permission Sets.
Select SCC Administrator and then Service Presence Statuses Access.
Choose Edit, select the status you created in step a above, and choose the right arrow, and Add, so it appears under Enabled Service Presence Statuses, and then choose Save.
Do the same for SCC Agent permission set.
Go to Feature Settings, Service, Omni-Channel, and then Routing Configurations.
Choose New.
Type Routing (or any name you like) in the Routing Configuration Name field.
Enter 1 for Routing Priority and choose External Routing as the Routing Model.
Enter 1 for Units of Capacity and choose Save.
Go to Feature Settings, Service, Omni-Channel, and then Presence Configurations.
Choose Edit next to Default Presence Configuration.
Enable Allow agents to decline work requests and choose Save.
Go to Users and then Queues.
Choose New.
Type Queue (or any name you like) in the Label field.
Under Configuration with Omni-Channel Routing, choose the magnifying glass icon next to the Routing Configuration field.
In the popup window, choose the name in the Developer Name column of the routing configuration you created in the previous step.
In Supported Objects, select Messaging Session under Available Objects, choose the right arrow and Add so it appears under Selected Objects.
Under Queue Members, select your user, SCCAC Agent, SCC ApiAccessUser and any other user for agent and choose the right arrow and Add, so it appears under Selected Members. Then choose Save.
Go to Feature Settings, Service, Voice, and then Partner Telephony Contact Centers.
On this page select your contact center name and scroll down to the Queue Mapping section.
Choose Add. For the Salesforce Queue, select the queue you just created, and for the Amazon Connect Queue select the SCC-BasicQueue, and then choose Save.
Go to Feature Settings, Service, Messaging, and then Messaging Settings.
Select the messaging channel under Channel Name.
Under Omni-Channel Routing, set Routing Type as Omni-Queue, and under Queue, type the name of the queue you created. It should be suggested in the list that will appear; select it, and then choose Save.
At this point, if you’re still logged into the AWS console in this browsing context, sign out of the AWS console (and also your Amazon Connect instance, if you’re signed in as the emergency admin user). When you go active in Omni-Channel, Salesforce will use SAML to sign you into AWS and into Amazon Connect, using an IAM role they set up which only has access to Amazon Connect. If you need to do things as the root user in your AWS account, use an incognito window to sign into the AWS console.
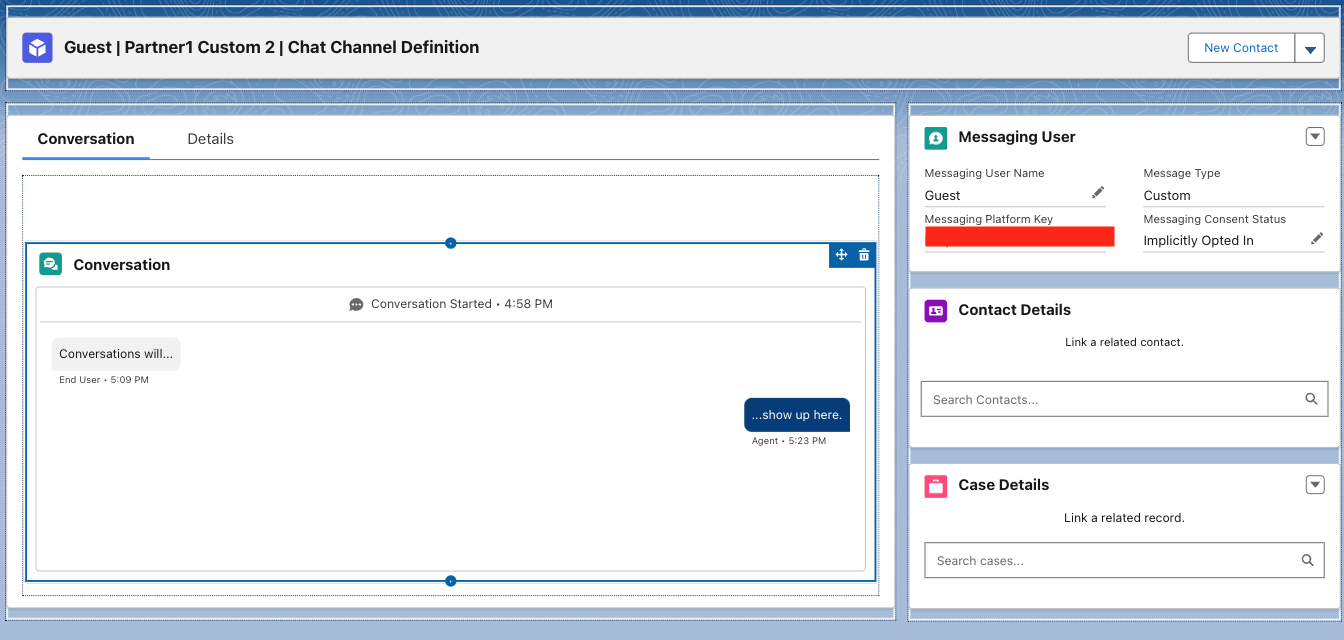
Log in as SCCAC Agent in Salesforce.
Choose the App Launcher (9 dots in a 3x3 grid on the upper left) and choose View All, find the button for your newly created app, and drag it to the first position using the handle on the right side of the button. Choose it and you should see Amazon Connect for Salesforce and Omni-Channel on the bottom.
Expand Omni-Channel and you should be able to choose the dropdown arrow and select your Active status.
Once Omni-Channel shows your Active status, verify that the agent is available to handle contacts by confirming the Omni-Channel widget displays "Active" status.
If the agent does not appear as available after setting the Omni-Channel status to Active, refer to the troubleshooting guide.