Setup Routing
Configure contact flow with your messaging channel’s Channel Address Identifier
- Log into your Amazon Connect instance.
- Go to Routing > Flows and find the SCCAC - Sample Inbound Flow - {ContactCenterId}. Select the flow and go to the Save dropdown > Save As > and enter a name for your SCCAC Inbound Flow.
NOTE
Do not use the SCCAC - Sample Inbound Flow directly as this gets re-set to its default configuration when upgrading resource versions.
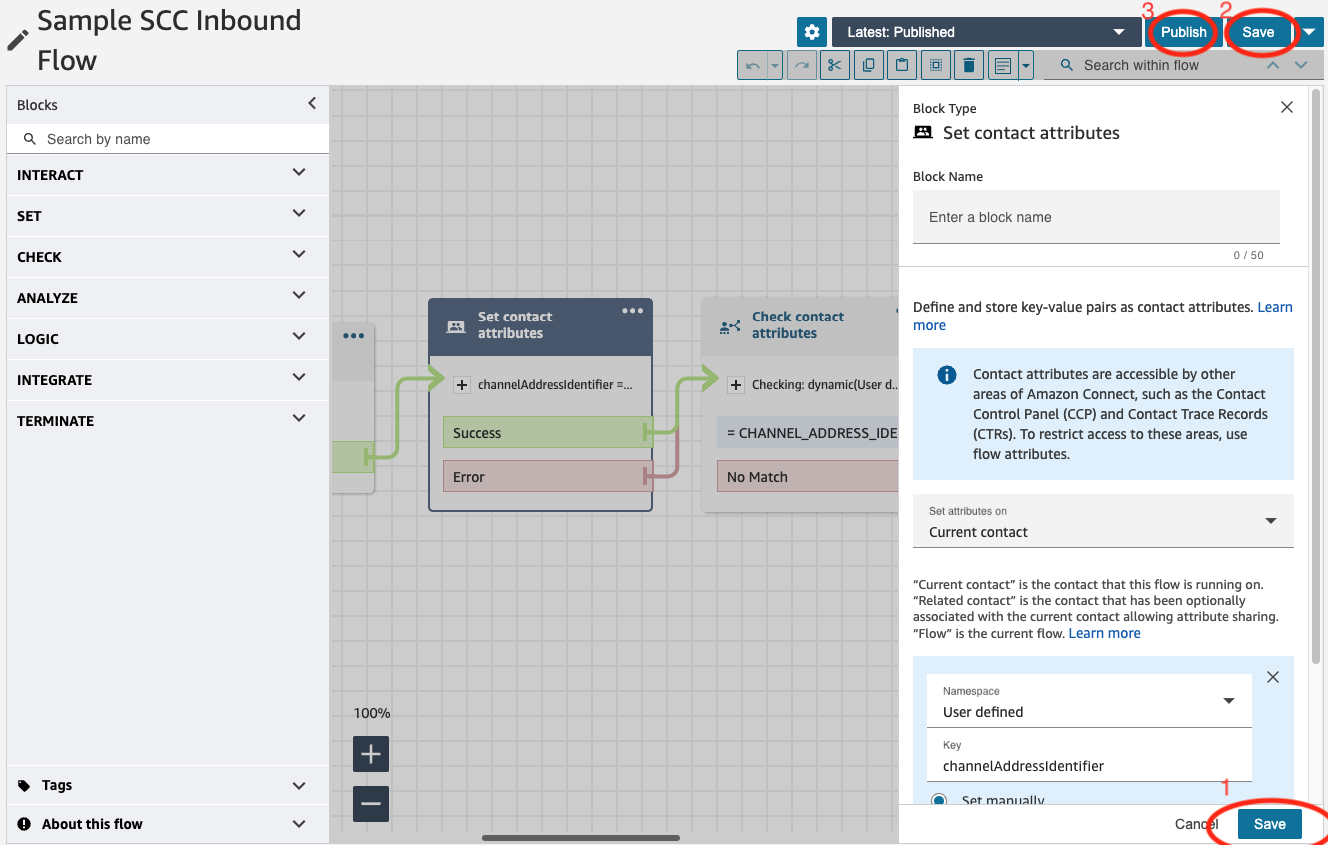
- Find the Set contact attributes block at the beginning that sets the
channelAddressIdentifierattribute.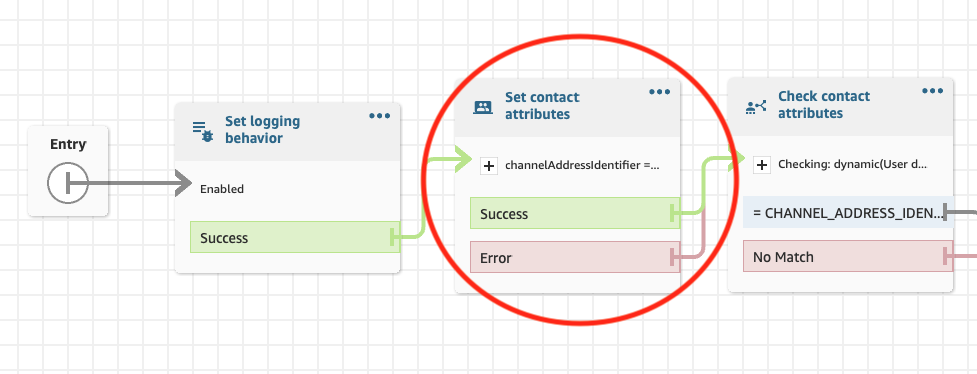
- Choose the block, and replace the value
CHANNEL_ADDRESS_IDENTIFIER_PLACEHOLDERwith the Channel Address Identifier listed in Salesforce for the messaging channel you’d like to use to handle contacts routed using this contact flow. - Choose Save on the bottom, then at the upper-right, choose Save and then Publish to make your changes live.
Update Routing Profiles
- Log into your Amazon Connect instance.
- Go to Users, Routing Profiles, select the Basic Routing Profile.
- Make sure that the queues for Queues and Default outbound queue are set to SCCAC-BasicQueue-{ContactCenterId}, and choose Save.
(Optional) Configure messaging channel for Omni-Flow or Omni-Queue routing
By default, chat contacts will be routed to Amazon Connect agents assigned to the queue SCC-BasicQueue, as this is the default queue for Sample SCC Inbound Flow. If you want to use a particular queue to route chat contacts in this messaging channel, or route contacts using an Omni-Channel Flow, you can configure this on your messaging channel in Salesforce.
- In Salesforce Setup, search for Messaging Settings, then select your messaging channel.
- Routing via a specific Omni-Queue:
- In the Omni-Channel Routing section of the page, you can choose Omni-Queue for Routing Type, and then specify the Omni-Queue that should be used to route the contact.
- If the queue chosen is mapped to an Amazon Connect queue in your Salesforce contact center, the chat contact will be routed to Amazon Connect agents staffed on the mapped queue, instead of the default SCC-BasicQueue.
- Routing via an Omni-Channel Flow:
- Refer to Salesforce documentation to learn how to create an Omni-Channel Flow that will route messaging sessions to a queue.
- In the Omni-Channel Routing section of the page, you can also choose Omni-Flow for Routing Type, and then specify the Omni-Channel Flow that should be used to route the contact.
- Your flow must end with a Route Work action that routes work to a queue. If the Salesforce queue is mapped to an Amazon Connect queue in your Salesforce contact center, the chat contact will be routed to Amazon Connect agents staffed on the mapped queue instead of the default SCC-BasicQueue.
- If an error occurs while the Omni-Channel Flow executes, then the work item is routed to the fallback queue specified. If this queue is mapped to an Amazon Connect queue in your Salesforce contact center, the chat contact will be routed to Amazon Connect agents staffed on the mapped queue, instead of the default
SCC-BasicQueue.
(Optional) Configure advanced routing overrides in the contact flow
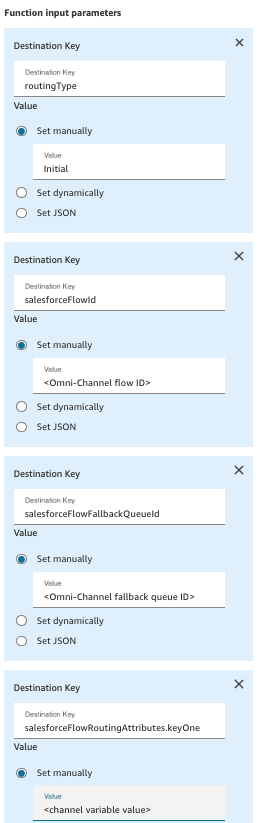
You can also override the routing configuration on your messaging channel by adding additional parameters to the Execute routing function block of type Invoke AWS Lambda function, in the SCCAC - Sample Inbound Flow - {ContactCenterId}. In any case, you must retain the default parameter routingType=Initial.
Route via a specific Omni-Channel Queue
In the SCCAC - Sample Inbound Flow - {ContactCenterId} contact flow, pass the parameter salesforceQueueId, with the ID of the Omni-Channel Queue in Salesforce you would like to use to route the contact. The Omni-Channel queue must be mapped to an Amazon Connect queue in the Salesforce contact center; the contact will be routed to agents staffed on the mapped queue in Amazon Connect.
Route via a specific Omni-Channel Flow (with specified fallback queue)
-
In the SCCAC - Sample Inbound Flow - {ContactCenterId} contact flow, pass the parameter salesforceFlowId, with the ID of the Omni-Channel Flow in Salesforce you would like to use to route the contact.
-
You must also pass the parameter
salesforceFlowFallbackQueueIdand provide the ID of an Omni-Channel queue to use as a fallback for routing in case the Omni-Channel Flow encounters an error. The Omni-Channel queue must be mapped to an Amazon Connect queue in the Salesforce contact center; the contact will be routed to agents staffed on the mapped queue in Amazon Connect. -
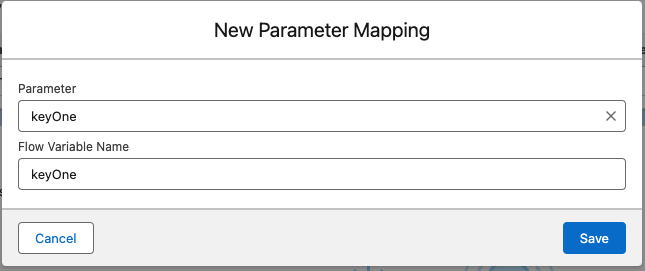
Optionally, you can pass additional parameters that will be available as channel variables during the execution of your Omni-Channel Flow, by prefixing them with the value
salesforceFlowRoutingAttributes. For example, if you add a parametersalesforceFlowRoutingAttributes.keyOneto the Execute routing function block, its value will be available as the channel variablekeyOne.-
In Salesforce Setup, on the Messaging Settings page for your messaging channel, you will need to create a custom parameter whose Channel Variable Name matches the variable name you will pass.

-
On the same page, create a Parameter Mapping for the channel variable.
-
Your Omni-Channel Flow must have a variable resource with a name matching the Flow Variable Name, that is marked as Available for input.

-
Example function parameters in the inbound contact flow:
-
(Optional) Provide clientId attribute from your customer chat implementation
If you have a unique identifier available for your chat customer (such as an email address) in the context where you’re initiating the chat session with Amazon Connect, you can provide this identifier as the contact attribute clientId. Salesforce will use this value to associate the new chat contact with previous chat interactions with the same customer, and agents will be able to see the transcripts of past chat conversations with the same customer in the Enhanced Conversation widget in Salesforce, in addition to the messages from the current chat interaction.
Keep in mind that if you pass a
clientIdvalue, it should be unique for each customer; Salesforce will consider chats initiated using the sameclientIdas originating from the same end user.
The easiest way to pass this contact attribute varies by chat initiation method:
- StartChatContact API / Mobile SDKs: Pass clientId attribute in Attributes key
- Amazon Connect Communications Widget: Follow the Amazon Connect administrator guide to provide the attribute value as part of a JWT payload, or pass it directly from the snippet code (NB: for the latter approach, the contact attribute key will be prefixed with HostedWidget-, so you’ll need to add a Set contact attributes block to the start of your contact flow to copy the value to the attribute
clientId).