Appendix B: Configuring Salesforce as Your Identity Provider
Prerequisites
To complete the SSO integration between Salesforce and Amazon Connect, you need:
An Amazon Connect Instance configured for SAML authentication
Appropriate AWS permissions to create Identity and Access Management (IAM) roles and policies
Administrator permissions for your Salesforce Org
Amazon Connect CTI Adapter AppExchange package installed and configured
Configuring Salesforce as an Identity Provider
First, we need to enable Salesforce to act as an identity provider (IdP). An IdP performs end user authentication and provides the credentials to the requesting service provider. In this case, Salesforce server as the IdP and Amazon Connect the service provider, while being embedded in Salesforce.
Setup Identity Provider & Download Metadata
Log in into your Salesforce org and go to Setup.
In the Quick Find field, type Identity Provider, then select Identity Provider from the result list
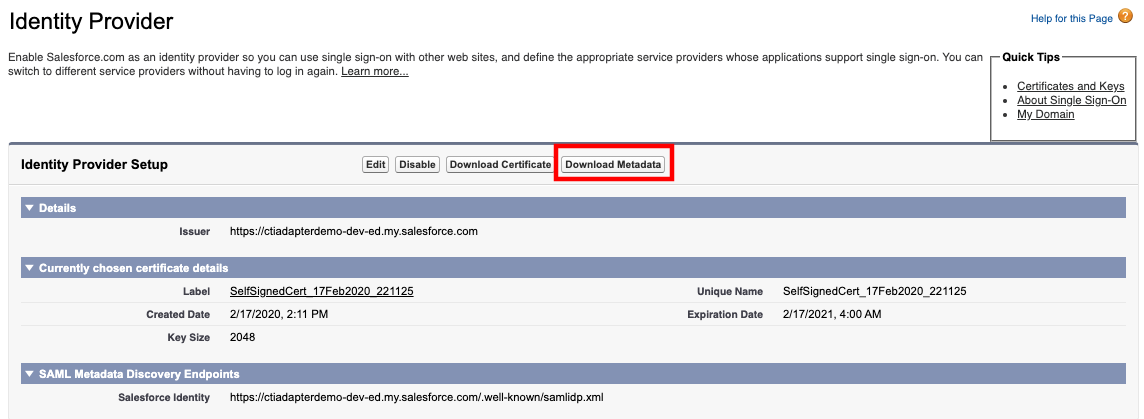
Identity Provider may be enabled by default. If not, choose Enable Identity Provider, then select the appropriate certificate and select Save.
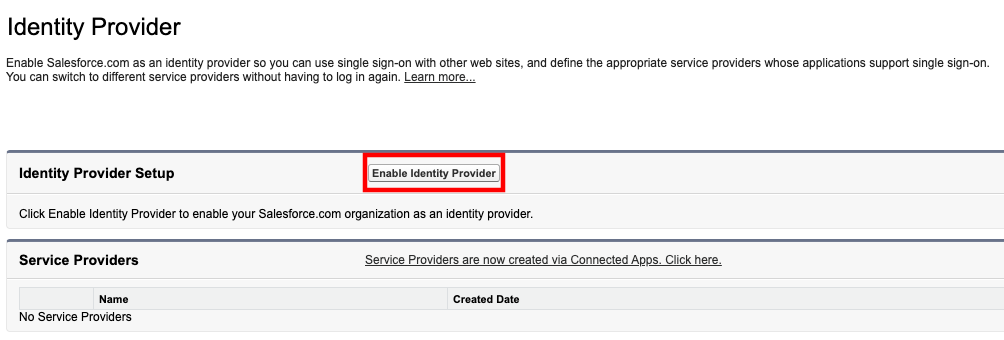
- Choose Download Metadata and save the file to your computer.
Configure the Identity Provider, Policy, and Role in the AWS Console
Next, you need to configure the identity provider (Salesforce) in the AWS console and provide access to Amazon Connect via IAM policies and roles. This allows AWS to acknowledge Salesforce as the identity provider and to provide users authenticated through Salesforce with the access required to login to Amazon Connect.
Configure the Identity Provider
Login to the AWS console
Select Identity providers

Choose Add Provider
On the Configure Provider screen, select SAML as the Provider Type
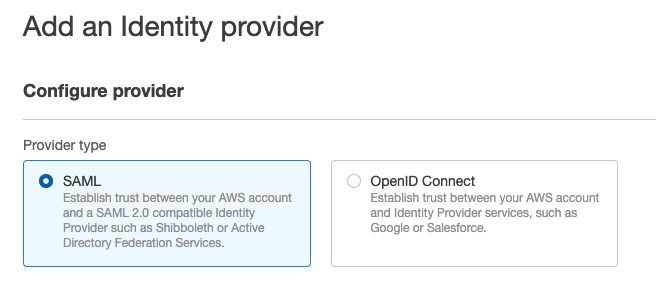
Set the Provider Name to SalesforceConnect
Import the metadata file you downloaded previously by selecting Choose File and navigating to the downloaded metadata file.
Select Next Step
Choose Create
The Identity provider has been created
Create the IAM Role and Policy
Login to the AWS console
Select Roles, then choose Create role
Choose SAML 2.0 federation
In the SAML provider dropdown, select the provider you just created, which should be named SalesforceConnect
Select the radio button for Allow programmatic and AWS Management Console access. The Attribute and Value fields should auto-populate
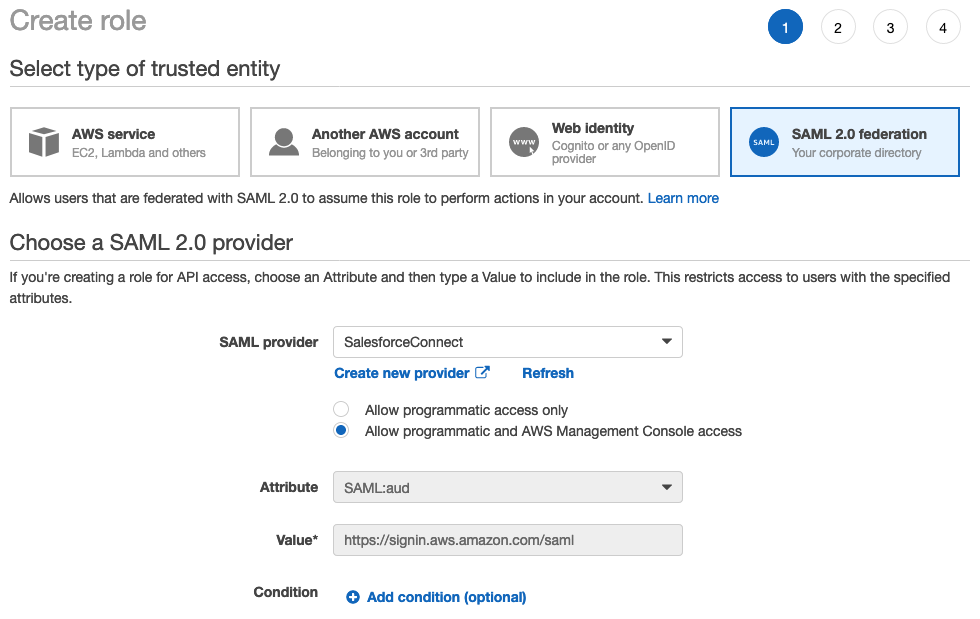
Select Next: Permissions
On the Attach permissions policies page, select Create policy. This will open a new browser tab.
Choose the JSON tab to switch to the JSON editor
Replace the existing JSON with the following:
{
    "Version": "2012-10-17",
    "Statement": [
        {
            "Sid": "Statement1",
            "Effect": "Allow",
            "Action": "connect:GetFederationToken",
            "Resource": [
                "**YOUR ARN**/user/${aws:userid}"
            ]
        }
    ]
}
Replace YOUR ARN with the ARN of your Amazon Connect instance. To find your Amazon Connect instance ARN:
Open a new tab in your browser and navigate to Amazon Connect Console
Click on the name (alias) of your Amazon Connect instance
Copy the Instance ARN and paste it to your computer's notepad (you will use it in a few places)
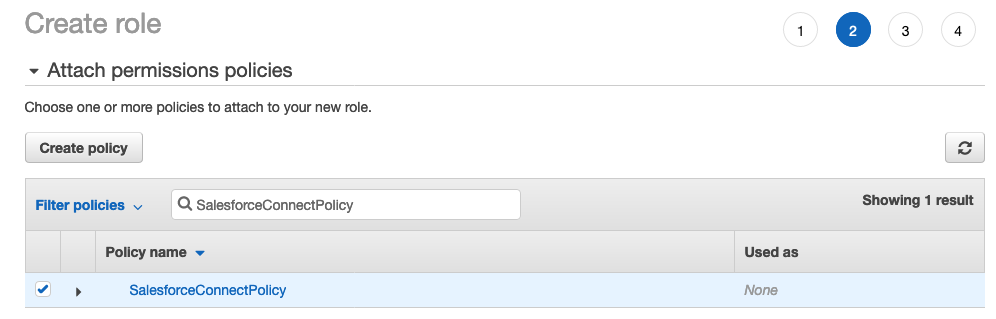
Choose Review policy
Set the Name to SalesforceConnectPolicy
Select Create Policy
Once the Policy has been created, close the tab, go back to the original (Role) tab in your browser and select the Refresh button (do not refresh the browser)
In the search field, enter SalesforceConnectPolicy and select the box to attach the policy.
Choose Next: Tags and set tags if desired, then choose Next: Review
Name the Role SalesforceConnectRole and provide a description if you like
Select Create role
Complete the Base Salesforce Configuration
Next, you need to configure a Connect App in Salesforce and provide further configuration to complete the SAML integration.
Create the Connected App in Salesforce
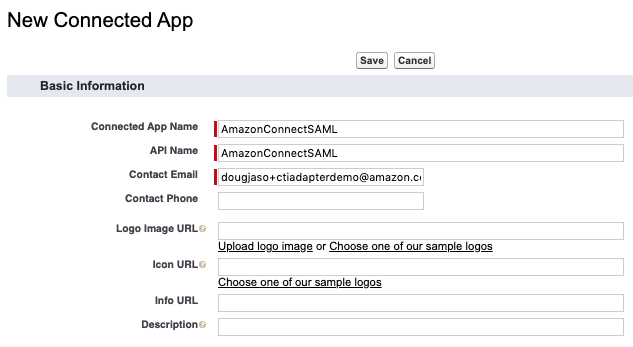
Log in into your Salesforce org and go to Setup
In the Quick Find field, type External Client Apps, then select Settings from the results
In the Connected Apps section, toggle on Allow creation of connected apps if it is not yet enabled and select Enable on the pop-up that appears. Then, select the enabled New Connected App button.
*Note: If you're not able to enable creation of Connected Apps in Salesforce, contact Salesforce Customer Support to have this re-enabled. This can be done by creating a Salesforce Support case.
Provide a name for the Connected App, such as AmazonConnectSAML, then press tab and the API Name should auto-populate
Provide an email contact address
In the Web App Settings section, choose Enable SAML
Leave Start URL empty
Set Entity Id to the same name that you gave the Identity Provider in the IAM console, which should be SalesforceConnect
Set ACS URL as https://signin.aws.amazon.com/saml
Set Subject Type as Persistent ID
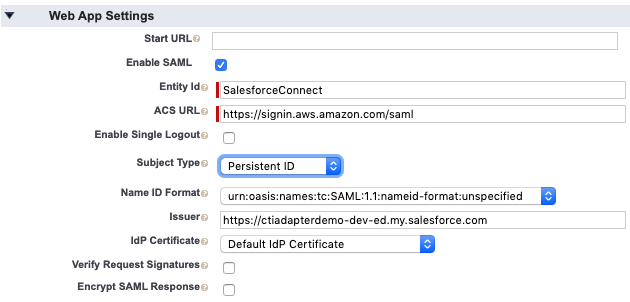
Choose Save. The screen should refresh and the new Connected App should be displayed
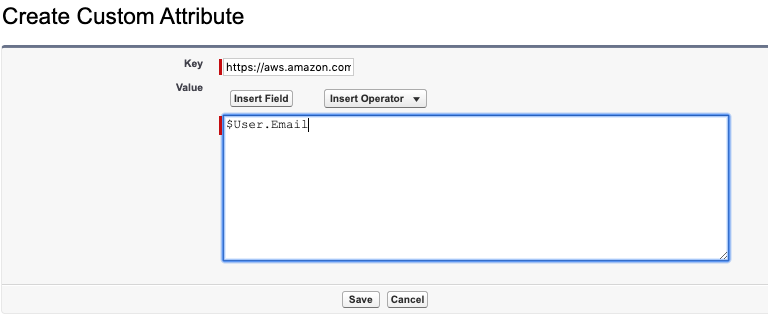
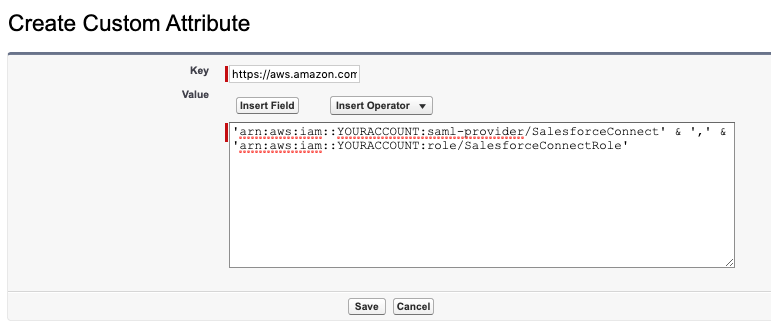
Scroll down to the Custom Attributes section and select New
Set Key as https://aws.amazon.com/SAML/Attributes/RoleSessionName
Set Value as $User.Email
Select Save
Select New again to configure another custom attribute
Set Key as https://aws.amazon.com/SAML/Attributes/Role
The Value is going to be a combination of the Indentity Provider and IAM Role ARNs.
a. In a new tab, open the AWS identity and Access Management (IAM) Console
b. On the left navigation, select Identity providers
c. Select the Identity provider you created earlier, which should be named SalesforceConnect
d. Copy the Provider ARN to your computer's notepad
e. Return to the IAM console and select Roles
f. Select the Role you created earlier, which should be SalesforceConnectRole
g. Copy the Role ARN to your computer's notepad
h. Format the combined value as follows: 'Identity Provider ARN' & ',' & 'Role ARN'
i. Paste the formatted value into the Custom Attribute Value
Select Save
At the top of the Connected App description, select Manage
Scroll down to the SAML login Information section
Copy the IdP-Initiated Login URL to your computer's notepad
Scroll down to find the Profiles section, then select Manage Profiles
Select a profile from the list, for example System Administrator for testing purposes
Choose Save
Open a new tab in your browser and navigate to IdP-Initiated Login URL that you copied in an earlier step
The browser will redirect to AWS Console and log you in automatically as a federated user Note: you may be able to see AWS services, but you should have no configuration rights.

The Federated Login consists of the Role name and your Salesforce email address.
Initial validation is complete
Complete the Amazon Connect Configuration
The last step in the SAML setup is to add users to Amazon Connect that exist in your Salesforce org, then validate login. It is critical that the usernames for both platforms match exactly.
Add Users to Amazon Connect
In a new browser tab, login to the AWS console
Open the Amazon Connect Console
Select the name (alias) of your Amazon Connect instance
Choose Log in for emergency access
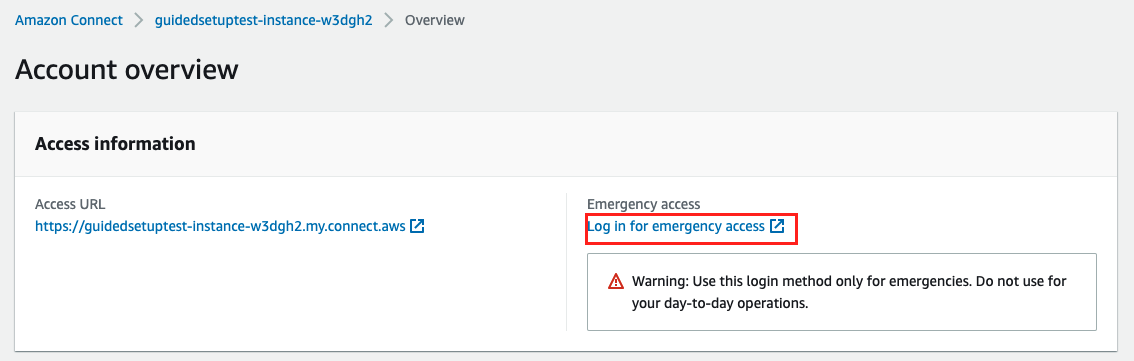
Within the Amazon Connect administration portal, select Users then choose User Management
Leave Create and setup a new user selected and choose Next
Complete the First and Last name fields as appropriate
Set the login name to match the Email Address of your Salesforce user
Set the Routing Profile. In this example, the default Basic Routing Profile is shown
Set the Security Profile. In this example, Admin is shown
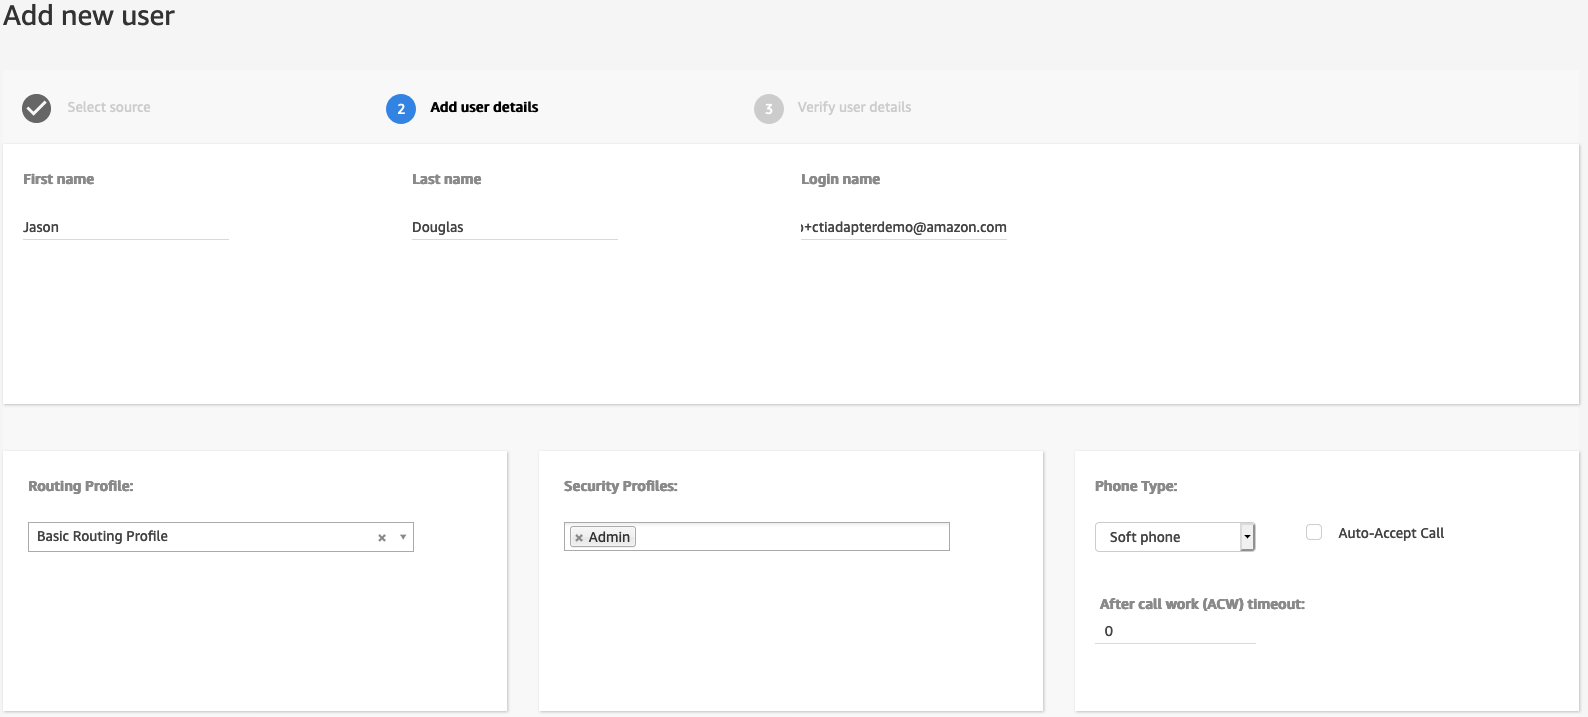
Select Save
Select Create Users
Repeat this process as required for your staff
Final Configuration for the Lightning Experience
Now that all of the underlying pieces are in place, the last steps are to create the Amazon Connect Single Sign On URL and validate that it works correctly, then configure the Lightning CTI adapter and login the agent.
Create the Amazon Connect SSO URL
You create the Amazon Connect SSO URL by combining the IdP-Initiated Login URL that you copied earlier, and a relay state URL that will redirect the authenticated user to your Amazon Connect instance.
The 'RelayState' will be in the following format (replace us-west-2 with the region you are using):
https://us-west-2.console.aws.amazon.com/connect/federate/InstanceId?destination=%2Fconnect%2FccpTo begin, format the relay state URL by replacing InstanceId with your Instance Id. To find your Amazon Connect Instance Id:
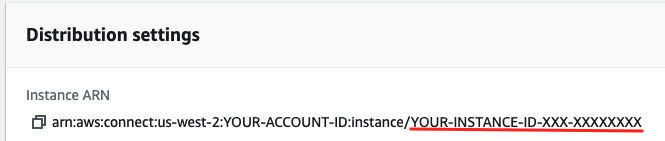
a. Open a new tab in your browser and navigate to the Amazon Connect Console
b. Click on the name (alias) of your Amazon Connect
c. From the Instance ARN, copy the portion after the '/'. This is the Instance Id
- Concatenate the 'IdP-Initiated Login URL' and the 'RelayState', by combining the two with "&RelayState=" in between, for example:
https://mXXXXXXrun-dev-ed.my.salesforce.com/idp/login?app=0sp0N000000Caid&RelayState=https://us-west-2.console.aws.amazon.com/connect/federate/InstanceId?destination=%2Fconnect%2FccpThis is the Final SSO URL, needed for the Amazon Connect Lightning CTI Adapter Configuration.
To validate this URL:
a. Open a new tab in the same browser that you are logged into Salesforce
b. Paste the fully concatenated URL into the new browser and press enter
c. You should automatically login and be redirected to the Amazon Connect Contact Control Panel.
Once you validate the full URL, you are ready to add it to the Lightning Adapter
Configure the CTI Lightning Adapter in Salesforce For SSO
Now we are ready to complete the last step in the configuration process: Adding the SSO settings for Salesforce to the Lightning Adapter. This will configure the adapter to authenticate via SSO and redirect to the Amazon Connect Contact Control Panel once authentication completes.
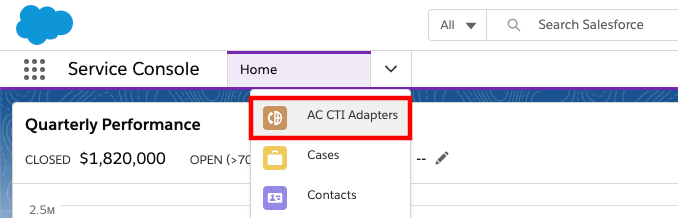
Log in into your Salesforce org and go to the Service Console
Expand the navigation menu by selecting the down arrow and choose AC CTI Adapters.
Select ACLightningAdapter
Scroll down to the Single SignOn (SSO) section and choose the pencil icon of either field to edit

For the SSO Url, copy the first part of the SSO URL that you created previously, up to the first question mark (do not copy the question mark), for example:
https://mXXXXXrun-dev-ed.my.salesforce.com/idp/login?app=0sp0N000000Caid&RelayState=https://us-west-2.console.aws.amazon.com/connect/federate/<b>InstanceId</b>?destination=%2Fconnect%2FccpPaste this portion of the URL into the SSO Url field

For the SSO Relay State, copy everything AFTER the question mark (do not copy the question mark), for example:
https://mXXXXXXrun-dev-ed.my.salesforce.com/idp/login?app=0sp0N000000Caid&RelayState=https://us-west-2.console.aws.amazon.com/connect/federate/<b>InstanceId</b>?destination=%2Fconnect%2FccpPaste this portion of the URL into the SSO Relay State field

- Choose Save
Note: With the new Amazon Connect instance urls (
*.my.connect.aws) you must put the full URL into theAmazon Connect Instancefield in the AC CTI Adapter record for SSO to work. Ex: usinghttps://myinstance.my.connect.awsinstead ofmy instance.
Refresh your browser to make the changes take effect
a. NOTE: If you receive a blocked popup warning, select the warning and change the setting to always allow popups from your Salesforce org, then refresh the browser again

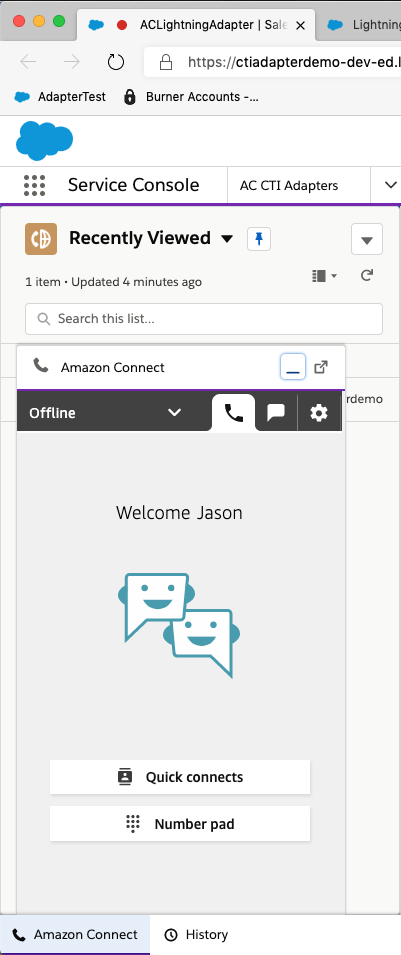
Select the phone icon in the console toolbar to open the CCP Note: You may also receive popups to allow notifications and microphone access. Please accept both.
Click the Sign into CCP button
You should now see the authenticated and logged in CCP
- Configuration is complete